

yo what’s up? how is goin’ ? i’m back again to posting… today i wanna show u how to remote a server from 2 operating system, today i’m using windows 7 and centOS 6.6. and i wanna give you a tutorial how to remote a server from client to the server. who being the client is windows 7 and being the server is centOS 6.6.
what do u need is :
- operating system
- GNS3
- VirtualBox
- Putty on Windows 7 VB (if u want the alternate, use the cmd.exe)
So, let’s go!!
1.) TOPOLOGY

As u can see, the first is… run the gns3 to build the topology, like this. then put the switch, host, and cloud. the client what i used is windows 7 and the server is centOS, and don’t forget the switch to connect them both, to build a remote server. Why using a cloud? I’m using the cloud because, when them was connecting , there is not a connection network. So, why i use the cloud is to connect the Internet going to switch and then connecting to them both the client and server.
2. Table Addressing

3. Purpose
- to know how to configuration telnet the CentOS and windows 7
- to know how to remote a server from another system operation
- to know how to make a simulation and result the security of telnet from the wireshark
4. Basic Concepts
this learning to make a goal for how to making the remote server using the CentOS from the windows 7, how to make a configuration telnet from CentOS and Windows 7, and last making an analysis the simulation is going.
5. Configuration
how make the remote server is working? or making the telnet is working? let me show u how to do it, check this out.
Chapter 1.1
before doing a remote, make sure CentOS was installed. and run it.
- the first thing what u to do, is insert the command :
yum install telnet telnet-server -y

2. after do the installation, insert the command :
vi /etc/xinetd.d/telnet

edit on the text “disable=yes” to be no, then insert “:wq” to save and quit from vi editor
3. after that, do the command :
service xinetd start

4. after running the xinetd, make sure the telnet keep working until every booting. Do the command :
chkconfig telnet on
chkconfig xinetd on

5. next, run the firewall to make the telnet easy to used. with the command
vi /etc/sysconfig/iptables
then add this text to the iptables, between the “-A INPUT -i lo -j ACCEPT” and “-A INPUT -m state”
-A INPUT -p tcp -m state –state NEW –dport 23 -j ACCEPT

6. after that, restart the firewall, with using this command :
services iptable restart

7. because i’m not using the another ethernet, and i’m just using one ethernet is eth0. then, add new user to login in another system operation, with the command :
adduser “nameuser”
passwd “nameuser”
8. after that, run the windows 7 on virtualbox and then add putty on there. and then setting the ip address on windows 7

9. next, we have to activaed or turn on the telnet server and client on windows 7. just go to Control Panel > programs > turn windows features on or off

10. run the putty and then insert the IP address from the CenOS. where i can that IP address? look at ifconfig and then see the IP address on the eth0
11. and then login into putty and then u can remote the server.
NB : sorry if the screenshot is not enough
1.2 simulation of security on wireshark
how is work? open that GNS3, and then stop the client and server from the GNS3. on Topology summary, choose the client and then right-click, click on the “start capturing”. and then start that client and server from GNS3. run the putty on client as windows 7 with IP CentOS. then, login with user was u add before. after that, open GNS3 and right-click on client (windows 7) start the wireshark.

then find the telnet on the filter. after that, on the top of frame 1, there is an IP address with destination. choose it and then right-click

click on “follow TCP stream”
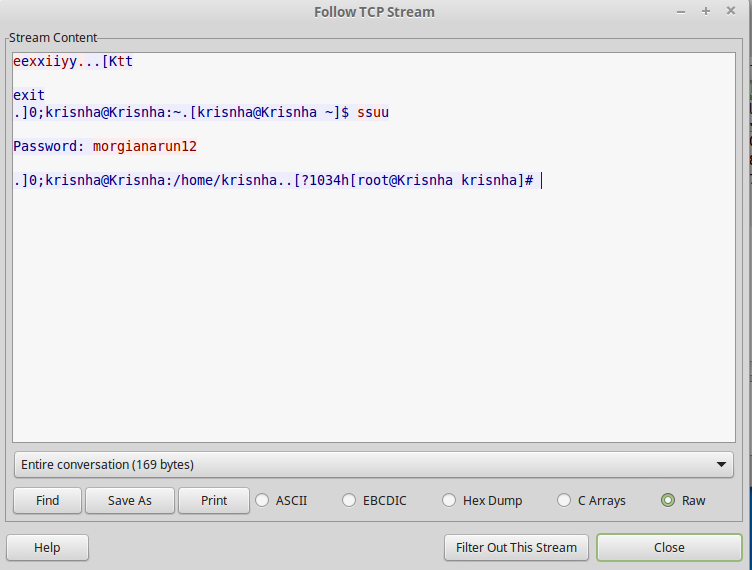
as u can see, u can saw the password of server, and then u can hack. wow, u can try on your pc and run it!
6.) Inferences
from me, the installation is not easy to go, with the secure not safely. for the daily, the user telnet just used for session login. after telnet, there is a SSH like telnet, but is kind of different. this SSH was very secure more than telnet. but i will give some tutorial for next post.
that’s all from me, thx for visit and read my post. if still confused, u can give a comment for me and i will answer that. and, sorry for my bad english. see ya for next post, and… bye 🙂
